Android dev tutorial: Shared Preferences Screen in Android

Now that we are familiar with what Shared Preferences are and how they work, its time to actually look into one of the main applications of the Shared Preferences – the Shared Preferences Screen most commonly used as the Settings screen of many applications to remember the user preferences.

So start up your Main activity and start coding. Complete Source Code is at the bottom.

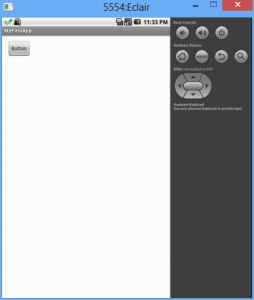
  • In the layout for you main activity, have a button that launches another activity which will be the Preferences Screen.
  • Create another activity Second.java. Remember to choose PreferenceActivity as the parent class for this activity and not the regular Activity.
  • Much like we set the content view of a normal activity, we need to provide this activity with a layout.
  • Go ahead and create an XML file second.xml. In the resource type choose Preference and not Layout. Leave the root element as PreferenceScreen.
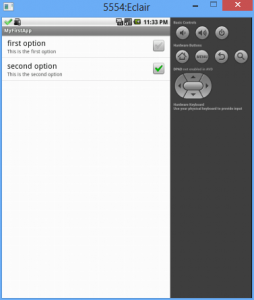
  • Go ahead and write the following code inside the <PreferenceScreen></PreferenceScreen> tags.
    <CheckBoxPreference
            android:key="first"
            android:title="first option"
            android:summary="This is the first option" />
    
    <CheckBoxPreference
            android:key="second"
            android:title="second option"
            android:summary="This is the second option" />
  • Remember that the android:key attribute that is present here is the key for the key-value pair that is present in the SharedPreferences. While accessing the value you will have to refer to it via this key.
  • Switch over to Second.java and paste the below code after super.OnCreate(Bundle savedInstanceState)
    [java]
    addPreferencesFromResource(R.xml.second);
    [/java]
  • In the above method, we have provided a layout for the activity. It is obvious that we have not used setContentView() method. For now it’ll be sufficient for you to know that in order to provide a PreferenceScreen a layout, we make use of addPreferenceFromResource() method. It takes care of all the saving and rewriting of values in SharedPreferences.
  • Switch over to the MainActivity.java file, get a reference to the button and set the onClickListener() method to call the activity Second.class, with the help of an intent.
  • Save your work and execute it on am emulator/device

spscreen1 spscreen2

  • Remember that the saving of values to SharedPreferences and rewriting the values, are done by Android on its own since the activity we have created inherits PreferenceActivity.
  • Now, to access the values in the SharedPreferences, add the below lines wherever you need it.
    [java]
    SharedPreferences settings = PreferenceManager.getDefaultSharedPreferences(this);
    boolean first = settings.getBoolean(“first”, false);
    [/java]
  • Remember that the method signature of the method above is getBoolean(key, defValue). So we need to provide the name of the key exactly. Recall that in second.xml we have given the value of first to the android:key attribute of our first CheckBoxPreference. Here we use the same value to get the value from the Shared Preferences.

COMPLETE SOURCE CODE

MainActivity.java

[java]
package com.nero.myfirstapp;

import android.media.MediaPlayer;
import android.os.Bundle;
import android.preference.PreferenceManager;
import android.app.Activity;
import android.app.AlertDialog;
import android.app.Dialog;
import android.app.ProgressDialog;
import android.content.DialogInterface;
import android.content.Intent;
import android.content.SharedPreferences;
import android.view.LayoutInflater;
import android.view.Menu;
import android.view.MenuItem;
import android.view.View;
import android.view.View.OnClickListener;
import android.widget.Button;
import android.widget.EditText;
import android.widget.Toast;

public class Main extends Activity {

@Override
protected void onCreate(Bundle savedInstanceState) {
super.onCreate(savedInstanceState);
setContentView(R.layout.activity_main);

SharedPreferences settings = PreferenceManager.getDefaultSharedPreferences(this);
boolean first = settings.getBoolean(“first”, false);

Button but = (Button) findViewById(R.id.button1);
but.setOnClickListener(new OnClickListener() {

@Override
public void onClick(View v) {
Intent intent = new Intent(MainActivity.this, Second.class);
startActivity(intent);
}
});
}
}

[/java]

Second.java

[java]
package com.nero.myfirstapp;

import android.app.Activity;
import android.os.Bundle;
import android.preference.PreferenceActivity;
import android.view.View;
import android.view.View.OnClickListener;
import android.widget.Button;
import android.widget.EditText;
import android.widget.TextView;

public class Second extends PreferenceActivity {
protected void onCreate(Bundle savedInstanceState) {
super.onCreate(savedInstanceState);
addPreferencesFromResource(R.xml.second);

}
}

[/java]

second.xml

<?xml version="1.0" encoding="utf-8"?>
<PreferenceScreen xmlns:android="http://schemas.android.com/apk/res/android" >

    <CheckBoxPreference
        android:key="first"
        android:title="first option"
        android:summary="This is the first option" />

    <CheckBoxPreference
        android:key="second"
        android:title="second option"
        android:summary="This is the second option" />

</PreferenceScreen>

Android dev primer: Shared Preferences – An Introduction

When you are into creating complex Android Applications, you will want the user to be able to customize the settings of your application according to his needs. Although not always, this is mostly where Shared Preferences are required in applications.

What are Shared Preferences?
When you need to save information across launches of your application with ease, you will be doing it with the help of Shared Preferences. It provides a way to preserve certain specific information even when your application is closed. It must however be remembered that it is definitely not the only way to do it. It is preferred over most other methods because it is predefined in Android for specifically this task alone.

In this post I’ll demonstrate the working of Shared Preferences. We will have an EditText in our activity. Once we write something in the EditText and close the application, in the subsequent launch of the application, the EditText will hold the same value. This is only the introduction as to how to use shared preferences and I will post about how to use it for cusomizable settings of an application. So start up an activity and follow along. Complete Source Code is at the bottom.

  • In the layout create an EditText.
  • Switch over to the java file and declare this EditText inside the class and outside all methods. We will be making it universally accessible because we will use it in more than one methods, as you will see shortly.
  • Inside the onCreate() method, get a reference to the EditText.
  • Now write the following lines in the onCreate() method.
    [java]
    SharedPreferences text = getSharedPreferences(“mypref”, 0);
    et.setText(text.getString(“prefvalue”, “”));
    [/java]
  • It is strongly advisable that you do not try to copy paste these lines and write them on your own. In the auto-complete suggestions of Eclipse IDE you will find small descriptions of the method signature and information about what this method does. It is necessary that you try and remember the function names.
  • Now, just like we’ve overridden the onCreate() method, we will override the onStop() method. This method is called when the activity is closed. Just as you start writing the onStop() method, make use of the auto-complete feature of Eclipse and well formatted method stub will appear.
  • Write the following lines inside the onStop() method.
    [java]
    super.onStop();
    SharedPreferences text = getSharedPreferences(“mypref”, 0);
    SharedPreferences.Editor editor = text.edit();
    editor.putString(“prefvalue”, et.getText().toString());
    editor.commit();
    [/java]
  • Save your work and execute it on an emulator/device.

Shared1

Understanding the Code

  • SharedPreferences holds the required information in the form of key-value pairs. Each key uniquely identifies a unit information or data.
  • While getting a reference to the SharedPreferences, we have made use of the function getSharedPreferences(String name, int mode). We have provided a name of mypref to the SharedPreference and a mode of zero. Remember that if a SharedPreference instance by this name does not exist already, Android creates one by this name.
  • To set the text of the EditText, we have made use of an overloaded version of setText() method. The signature for this method is setText(String key, String defValue). Here the key is the key for the key-value pair, as described in the first point. We have given it a value of prefvalue to it. defValue is the default value that appears if there does not yet exist a key-value pair where the key name is key, i.e prefvalue in this case.
  • Now, in order to store the text in the EditText in the SharedPreferences, we override the onStop() method because it is only when the activity is about to be closed that we need to save the text. We get a reference to the SharedPreferences by the name of mypref.
  • In order to be able to write something to the SharedPreferences we need a SharedPreference Editor. This is just like any other editor that allows writing of data.
  • With this editor, we now save the data to SharedPreferences by the help of putString(String key, String value) method. Remember, the key here should be the same as the one in the setText() method inside the onCreate() method, i.e. prefvalue in this case, the reason being that only then can the data we are saving, be uniquely identified.
  • Once we have told the editor what edits are required to be made, we want the editor to actually commit those changes on SharedPreferences, hence the commit() method.

COMPLETE SOURCE CODE

[java]
package com.nero.myfirstapp;

import android.media.MediaPlayer;
import android.os.Bundle;
import android.app.Activity;
import android.app.AlertDialog;
import android.app.Dialog;
import android.app.ProgressDialog;
import android.content.DialogInterface;
import android.content.Intent;
import android.content.SharedPreferences;
import android.view.LayoutInflater;
import android.view.Menu;
import android.view.MenuItem;
import android.view.View;
import android.view.View.OnClickListener;
import android.widget.Button;
import android.widget.EditText;
import android.widget.Toast;

public class Main extends Activity {

EditText et;

@Override
protected void onCreate(Bundle savedInstanceState) {
super.onCreate(savedInstanceState);
setContentView(R.layout.activity_main);
et = (EditText) findViewById(R.id.editText1);

SharedPreferences text = getSharedPreferences(“mypref”, 0);
et.setText(text.getString(“prefvalue”, “”));
}

@Override
protected void onStop() {
super.onStop();
SharedPreferences text = getSharedPreferences(“mypref”, 0);
SharedPreferences.Editor editor = text.edit();
editor.putString(“prefvalue”, et.getText().toString());
editor.commit();
}

}

[/java]

Dijkstra’s Algorithm

Given a network of cities and the distances between them,the task is to find the shortest path from a city(source) to all other cities connected to it.The network of cities with their distances is represented as a weighted digraph.It is also known as single-source,shortest path problem.

Algorithm-

N is the number of vertices labeled {0,1,2,3….N-1} of the weighted digraph.cost[0:N-1][0:N-1] is the cost matrix of the graph.If there is no edge from i to j,then cost[i][j]=INT_MAX.If i equals j,then cost[i][j]=0.
Vertex 0 is the source.
V is the set of N cities
T={0}; //T is initialized by adding the source vertex

//distance[] is initialized to the cost of the edges connecting vertex i with the source vertex 0.
for(i=1 to N)
{
distance[i]=cost(0,i);
}

for(i=0 to N-2)
{
Choose a vertex u in V-T such that distance[u] is a minimum;
Add u to T;

for each vertex w in V-T
{
distance[w]=minimum(distance[w],distance[u]+cost[u,w]);
}
}

Its time complexity is O(N^2) where N is the number of cities.

Code-

[cpp]

for(i=0;i<n;i++)
{
b[i]=0;
distance[i]=cost[0][i];
}
//b[i]=1 if i is in set T and b[i]=0 if it is in set V-T.

b[0]=1;//T is initialized
z=1;//counter initialized to 1

while(z!=n)
{
min=INT_MAX;

for(i=0;i<n;i++)
{
if((b[i]==0)&&(distance[i]<min))
{
min=distance[i];
u=i;
}
}
b[u]=1;
z++;
for(w=0;w<n;w++)
{
if((cost[u][w]!=0) && (b[w]==0) && (distance[u]!=INT_MAX) && (distance[u]+cost[u][w]<distance[w]))
{
distance[w]=distance[u]+cost[u][w];
}
}

}

//printing the shortest distances
for(i=0;i<n;i++)
printf(“%d “,distance[i]);

[/cpp]

Example-

If the cost matrix is-

@ denotes INT_MAX

0 20 @ 40 110
@ 0 60 @ @
@ @ 0 @ 20
@ @ 30 0 70
@ @ @ @ 0

The output is-

distance[0]=0
distance[1]=20
distance[2]=70
distance[3]=40
distance[4]=90

Android Dev Primer: Adding Camera Functionality in Android

Often, in your Android application, you will want to incorporate photos that the user takes from his camera. Just like audio and video, it is possible and rather fairly easy to include camera functionality in your Android application.

In this post I will show you how to take the user to the default camera application from our application, click a photo and then return that photo to our application. We can then make use of that photo any way we want. So start up an activity and start coding. Also remember that when it comes to testing camera related features, we are going to do this on an actual Android Device and not an emulator for obvious reasons.   Complete Source Code is at the bottom.

  • For the layout of the activity, have a Button and an ImageView. I would advise you to make the ImageView stretch through the entire width and height of the layout, left after placing the button. We would be placing the photo taken from the camera here.
  • Switch over to the Java file and declare both, the Button and the ImageView in there. Remember to declare the ImageView inside the class and not inside the onCreate() method. This is because we will be using it in other methods as well.
  • Inside the onClick() method of the Button, write the following
    [java]
    Intent intent = new Intent(android.provider.MediaStore.ACTION_IMAGE_CAPTURE);
    startActivityForResult(intent,0);
    [/java]
  • Now, we need to get the clicked photo back from the camera to our application. For this we will override the onActivityResult() method of the Android.Activity class. Write the following code just after the onCreate() method.
    [java]
    protected void onActivityResult(int requestCode, int resultCode, Intent data){
    super.onActivityResult(requestCode, resultCode, data);
    Bitmap bm = (Bitmap)data.getExtras().get(“data”);
    iv.setImageBitmap(bm);
    }
    [/java]
  • Save your work and execute it on an Android device.
  • When you hit the button and get into the camera application, click a photo and you will be redirected to the original application with the photo you just clicked placed in the ImageView in your activity.

Understanding the Code

Let’s take some time and try to understand the code we just wrote

  • The Intent we used while calling the camera application is quite understandable. If you have read my previous posts, you will know what we use an intent for. The argument for the intent however, is a string constant that tells the Android system that we want to use the camera application – android.provider.MediaStore.ACTION_IMAGE_CAPTURE
  • android.provider refers to the content provider of Android. I will write about this in a later post.
  • MediaStore is the part of the content provider that we want to refer to.
  • ACTION_IMAGE_CAPTURE is the actual string we want.
  • Normally, while using Intents, we call the method startActivity(). Here, you can see, we have called startActivityForResult(Intent intent, int requestCode). Since, we need the result of the following Activity back in this activity, so we use the above method.
  • requestCode is useful when we have several requests being made from the activity. This helps us to uniquely identify the request.
  • Bitmap is used because the data that has been sent back to our activity has a Bitmap object. Hence we use the setImageBitmap() method.
  • data.getExtras().get(“data”) : The data passed to our Activity from the Camera is in the form of Extras. The name of the data is data.
  • An interesting thing to know here, is that we do not need to add permissions for the use of camera in our Manifest file. Why? Because once we a re switching to the default camera application, we are letting it do all the work. The permissions are granted for the Camera Application. However, if you would, sometime want to build you own camera UI, you will need to access the raw camera surface. In that case you will need to include the android.permission.CAMERA in your manifest file.

COMPLETE SOURCE CODE

[java]
package com.nero.myfirstapp;

import android.media.MediaPlayer;
import android.os.Bundle;
import android.app.Activity;
import android.app.AlertDialog;
import android.app.Dialog;
import android.app.ProgressDialog;
import android.content.DialogInterface;
import android.content.Intent;
import android.view.LayoutInflater;
import android.view.Menu;
import android.view.MenuItem;
import android.view.View;
import android.view.View.OnClickListener;
import android.widget.Button;
import android.widget.EditText;
import android.widget.Toast;
import android.graphics.Bitmap

public class Main extends Activity {

@Override
ImageView iv;
protected void onCreate(Bundle savedInstanceState) {
super.onCreate(savedInstanceState);
setContentView(R.layout.activity_main);
Button but = (Button) findViewById(R.id.but);
iv = (ImageView)findViewById(R.id.imageView1);

but.setOnClickListener(new OnClickListener() {

@Override
public void onClick(View arg0) {
Intent intent = new Intent(android.provider.MediaStore.ACTION_IMAGE_CAPTURE);
startActivityForResult(intent,0);
}

});

}
protected void onActivityResult(int requestCode, int resultCode, Intent data){
super.onActivityResult(requestCode, resultCode, data);
Bitmap bm = (Bitmap)data.getExtras().get(“data”);
iv.setImageBitmap(bm);
}
}

[/java]

Prims Algorithm

Let G=(V,E) be an undirected,connected and weighted graph.A sub-graph T=(V,E’) of G is a spanning tree of G if T is a
tree.There may be several spanning trees that may be extracted from it.A spanning tree has N vertices and N-1 edges.This is because of the property of trees.A minimum cost spanning tree is a spanning tree which has a minimum total cost.Prims algorithm can be used to obtain the minimum cost spanning tree.

Example-

cost[1:N][1:N] is the cost matrix of the graph.If there is no edge from i to j,then cost[i][j]=INT_MAX.If i equals j,then cost[i][j]=0.

Cost matrix for a graph is-

@ denotes INT_MAX

0 6 1 7 @ @
6 0 5 @ 3 @
1 5 0 5 6 4
7 @ 5 0 @ 2
@ 3 6 @ 0 6
@ @ 4 2 6 0

The minimum cost spanning tree consists of the edges-

(1,3) (3,6) (6,4) (3,2) (2,5)

This tree has a minimum cost of 1+4+2+5+3=15.

Algorithm-

Method 1-

V is the set of vertices.
Let R be the set of edges which are to be extracted to obtain the minimum cost spanning tree.
R=NULL ///Initialize R to null set
Select a minimum cost edge (u,v) from E.
S={u}; //include u in S.
while(S!=V)
{
Let (u,v) be the lowest cost edge such that u is in S and v in V-S;
Add edge (u,v) to set R.
Add v to set S.
}

Method 2-

1) Create a set S that keeps track of vertices already included in minimum spanning tree.
2) Assign a key value to all vertices in the input graph. Initialize all key values as INFINITE. Assign key value as 0 for the first vertex so that it is picked first.
3) While S doesn’t include all vertices
{
a) Pick a vertex u which is not there in S and has minimum key value.
b) Include u to S.
c) Update key value of all adjacent vertices of u. To update the key values, iterate through all adjacent vertices. For every adjacent vertex v, if weight of edge u-v is less than the previous key value of v, update the key value as weight of u-v.
u-v edge is in the MST.
}

The time complexity of Prims algorithm is O(N^2).

Android Development Primer: Working with Videos in Android

In the last post, I showed you how to integrate audios to your Android Application. Just like audios, we can also have our applications play videos if we want to.

However, one thing worth remembering is that once we are done with the programming part, we are going to want to run the application on an actual device not an emulator because it usually does not run the video file properly. Obviously, the video we are going to play will be stored on the sd card of the device and not in the application.

  • Create an activity and set it’s content view. We will not be adding any buttons here. In here, I will show you how to run the video file just when the activity starts. You can, of course, trigger this on a button click.
  • In the layout of the activity add a VideoView from the palette on the left. By default it occupies the complete space of the activity. This is exactly what we want. Again, you can limit the height and width according to your requirements.
  • Switch over to the java file and write the following code just after the setContentView() method().
    [java]
    VideoView v = (VideoView)findViewbyId(R.id.videoView1);
    v.setVideoPath(“/sdcard/myvideo.mp4”);
    v.setMediaController(new MediaController(this));
    v.start();
    v.requestFocus();
    [/java]
  • Save your work and execute it on an Android Device.

Understanding the Code

  • VideoView is a default view to support videos.
  • setVideoPath() : This function defines the exact location of the video file you want the application to run. Make sure you get the location, name and the format of the video file correct, failing which the application will behave in an unwanted manner.
  • setMediaController() : This function displays the media controls like play/pause, fast forward, rewind. We may choose to have this or not. It is generally advisable to have one so that the user has some control over the playback.
  • start() : It triggers the video playback.
  • requestFocus() : It might so happen that there are other modules of our application being executed along with the video playback. This function causes the video playback to stay on top of all these modules.

COMPLETE SOURCE CODE

[java]
package com.nero.myfirstapp;

import android.media.MediaPlayer;
import android.os.Bundle;
import android.app.Activity;
import android.app.AlertDialog;
import android.app.Dialog;
import android.app.ProgressDialog;
import android.content.DialogInterface;
import android.content.Intent;
import android.view.LayoutInflater;
import android.view.Menu;
import android.view.MenuItem;
import android.view.View;
import android.view.View.OnClickListener;
import android.widget.Button;
import android.widget.EditText;
import android.widget.Toast;

public class Main extends Activity {

@Override
protected void onCreate(Bundle savedInstanceState) {
super.onCreate(savedInstanceState);
setContentView(R.layout.activity_main);
VideoView v = (VideoView)findViewbyId(R.id.videoView1);
v.setVideoPath(“/sdcard/myvideo.mp4”);
v.setMediaController(new MediaController(this));
v.start();
v.requestFocus();
}
}

[/java]

Minimum Cost Path (DP Example)

Dynamic programming is a method for solving complex problems by breaking them down into simpler sub-problems. It is applicable to problems exhibiting the properties of overlapping sub-problems and optimal substructure.When applicable,the method takes far less time than naive methods that don’t take advantage of the sub-problem overlap.

A problem is said to have overlapping sub-problems if the problem can be broken down into sub-problems which are reused several times or a recursive algorithm for the problem solves the same sub-problem over and over rather than always generating new sub-problem.

A problem is said to have optimal substructure if an optimal solution can be constructed efficiently from optimal solutions of its sub-problems.

Example of dynamic programming-

Given a cost matrix cost[][] having m rows and n columns,the task is to find the cost of minimum cost path to reach (m-1,n-1) from (0,0).Each cell of the matrix represents a cost to traverse through that cell. You can only traverse down, right and diagonally lower cells from a given cell, i.e., from a given cell (i,j), cells (i+1,j),(i,j+1) and (i+1, j+1) can be traversed.

Example-

Cost matrix-

1 2 3
4 8 2
1 5 3

The minimum cost path is (0,0)–>(0,1)–>(1,2)–>(2,2). The cost of the path is 8 (1 + 2 + 2 + 3).

Recursive Code-

[cpp]
//mcost(m-1,n-1) is called.
//cost[][] is the cost matrix
int mcost(int a,int b)
{
if (b < 0 || a < 0)
return INT_MAX;
//base condition
else if (a == 0 && b == 0)
return cost[a][b];
else
return cost[a][b] + min( mcost(a-1,b-1),mcost(a-1,b),mcost(a,b-1) );
}
[/cpp]

Efficient Code-

[cpp]
//mcost(m-1,n-1) is called.
//temp[][] is used for storing the results which need to be calculated again & again.
int mcost(int a,int b)
{
int i, j;

int temp[R][C];

temp[0][0] = cost[0][0];

//initializing first column
//a cell in first column can be traversed only from cell just above it.
for (i = 1; i <= a; i++)
temp[i][0] = temp[i-1][0] + cost[i][0];

//initializing first row
//a cell in first row can be traversed only from cell just left to it.
for (j = 1; j <= b; j++)
temp[0][j] = temp[0][j-1] + cost[0][j];

//constructing rest of the array
for (i = 1; i <= a; i++)
{
for (j = 1; j <= b; j++)
{
temp[i][j] = min(temp[i-1][j-1], temp[i-1][j], temp[i][j-1]) + cost[i][j];
}
}
return temp[a][b];
}
[/cpp]

Time Complexity of the DP implementation is O(mn) which is much better than Naive Recursive implementation.

Android development primer: Working with Audio in Android

We can have audios in our Android application. It can be used as and when required and is decided by the Application Developer.
Adding and configuring audios to our application is fairly simple.

In this post I am going to show you how to add audios to your Android Application and play the audio. Complete Source Code is at the bottom.

  • Navigate to <yourprojectname> -> res.
  • Now right click on the res folder and select New -> Folder.
  • Name this folder raw. All the audios that you have in your application, necessarily need to be in a folder names raw inside the res folder.
  • Now copy-paste an audio file inside the raw folder. You can do this by navigating to the Eclipse workspace on your system and then to your project’s res folder, or you can drag and drop it in Eclipse itself.
  • Once the audio file is in your raw folder, create an Activity and set the content view. Make sure you have a button in the activity, so that the audio can be played when the button is clicked.
  • Now in the onClick() method of the button write the following code.
    [java]
    MediaPlayer mp = MediaPlayer.create(Main.this, R.raw.beep);
    mp.start();
    [/java]
  • Worth noting here, is the MediaPlayer class and that we have not used a constructor but a static method to initialize it. MediaPlayer class is used for any media related operations that you might have to perform. The mp.start() method starts the MediaPlayer. 
  • Save your work and execute it on an emulator/device.
  • It might happen that the audio file does not play on the emulator. In such circumstances, you must install the application on a device and check whether it works

COMPLETE SOURCE CODE

[java]
package com.nero.myfirstapp;

import android.media.MediaPlayer;
import android.os.Bundle;
import android.app.Activity;
import android.app.AlertDialog;
import android.app.Dialog;
import android.app.ProgressDialog;
import android.content.DialogInterface;
import android.content.Intent;
import android.view.LayoutInflater;
import android.view.Menu;
import android.view.MenuItem;
import android.view.View;
import android.view.View.OnClickListener;
import android.widget.Button;
import android.widget.EditText;
import android.widget.Toast;

public class Main extends Activity {

@Override
protected void onCreate(Bundle savedInstanceState) {
super.onCreate(savedInstanceState);
setContentView(R.layout.activity_main);
Button but = (Button) findViewById(R.id.but);

but.setOnClickListener(new OnClickListener() {

@Override
public void onClick(View arg0) {
MediaPlayer mp = MediaPlayer.create(MainActivity.this, R.raw.beep);
mp.start();
}

});

}
}

[/java]

Magic Square

A magic square is an arrangement of numbers in a square grid, where the numbers in each row, and in each column, and the numbers in the forward and backward main diagonals, all add up to the same number.A magic square of order N means it has N rows and N columns.It contains all integers from 1 to N^2.
The constant that is the sum of every row, column and diagonal is called the magic constant or magic sum.Let it be M.

M=[N*(N^2+1)]/2 where N is the order of magic square.

Example-

Magic square of order 3-

2 7 6
9 5 1
4 3 8

M(constant) = [3*(3^2+1)]/2 = 15.

Magic square of order 5-

9 3 22 16 15
2 21 20 14 8
25 19 13 7 1
18 12 6 5 24
11 10 4 23 17

The task is to generate the magic square given its order or number of rows/columns.

Algorithm-

There is a pattern in which the numbers are stored in a magic square.

In any magic square, the first number i.e. 1 is stored at position (N/2, N-1). Let this position be (i,j). The next number is stored at position (i-1, j+1) and the process continues.

Note-

1. If the calculated row position becomes -1, it will be N-1.Similarly,if the calculated column position becomes N, it will be equal to 0.
2. If the magic square already contains a number at the calculated position, calculated column position will be decremented by 2, and calculated row position will be incremented by 1.
3. If the calculated row position is -1 & calculated column position is N, the new position would be: (0, N-2).

Code-

[cpp]

int magicSquare[100][100];

// Initialize position for 1

int i = N/2;
int j = N-1;

// Putting values in magic square

for (int num=1; num <= N*N; )
{
//3rd condition
if (i==-1 && j==N)
{
j = N-2;
i = 0;
}
//1st condition
else
{
if (j == N)
j = 0;

if (i < 0)
i=N-1;
}
//2nd condition
if (magicSquare[i][j])
{
j -= 2;
i++;
continue;
}
else
magicSquare[i][j] = num++; //set number

j++; i–; //normal condition
}

[/cpp]

Note-

This approach works only for odd values of N.

Android development primer: Progress Dialog in Android – Horizontal Style

In the last post, we saw how to make a Progress Dialog with Spinner style progress bar. Here, we will see how to make a Horizontal Style bar.

  • Set the content view of the activity. Make sure the layout of the activity contains a button so that the Progress Dialog can be triggered on the click of the button.
  • After setting the content view, declare and define the button in the java file.
  • Add the Progress Dialog hereafter, using the following code.
    [java]
    final ProgressDialog pd = new ProgressDialog(this);
    pd.setProgressStyle(ProgressDialog.STYLE_HORIZONTAL);
    pd.setMessage(“Working…”);
    pd.setIndeterminate(false);
    pd.setCancelable(true);
    [/java]

    We will not be defining the Progress Dialog inside the onClick() method of the button so that we can use this dialog in other places, if need be.

  • Set up the onClickListener() and within it the onClick() methods. Inside the onClick() method, write the following code.
    [java]
    pd.show();
    pd.setProgress(30);
    [/java]

    In addition to showing the Progress Dialog we also need to set the progress of the bar.

  • Save your work and execute on an emulator/device.

Progress2

Points to Note :-

  • On examining the code carefully, you will find that in addition to change in the setProgressStyle(), the setIndeterminate() method now has a value of false.
  • This is because we will be showing the progress of the work in percentage now. So the dialog needs not be indeterminately displaying till the work ends.
  • We have set the initial percentage progress only for demonstration purposes. When you will be incorporating this in your application, you will be performing some tasks and updating the progress of the dialog accordingly.

COMPLETE SOURCE CODE

MainActivity.java

[java]
package com.nero.myfirstapp;

import android.os.Bundle;
import android.app.Activity;
import android.app.AlertDialog;
import android.app.Dialog;
import android.app.ProgressDialog;
import android.content.DialogInterface;
import android.content.Intent;
import android.view.LayoutInflater;
import android.view.Menu;
import android.view.MenuItem;
import android.view.View;
import android.view.View.OnClickListener;
import android.widget.Button;
import android.widget.EditText;
import android.widget.Toast;

public class Main extends Activity {

@Override
protected void onCreate(Bundle savedInstanceState) {
super.onCreate(savedInstanceState);
setContentView(R.layout.activity_main);
Button but = (Button) findViewById(R.id.but);
final ProgressDialog pd = new ProgressDialog(Main.this);
pd.setProgressStyle(ProgressDialog.STYLE_HORIZONTAL);
pd.setMessage(“Working…”);
pd.setIndeterminate(false);
pd.setCancelable(true);

but.setOnClickListener(new OnClickListener() {

@Override
public void onClick(View arg0) {
pd.show();
pd.setProgress(30);
//Do some more tasks
//update the progress of the dialog
//Do some more tasks
//update the progress of the dialog
}

});

}
}

[/java]