Custom Data Adapters with Checked List Views – Part I

We have been using ArrayAdapter and SimpleCursorAdapter while populating our List View with elements from an array and a database respectively. It is worth knowing that both these classes are subclasses of the DataAdapter class. The DataAdapter class is the primary class that allows for such adaptation and display of data.
Also, we have used simple List Views. On many occasions you would have seen List Views with checkboxes, that allow for multiple options to be selected.

This post along with the next, will show you how to do this. We will be using a custom Data Adapter with a List View containing checkbox. Remember that in Part I of this post I will show you how to create the Front End of the Activity, i.e. how to program the layout and the corresponding Java file for this activity. In the next post I will show you how to create the Custom Adapter in order for the Activity to work as decided. This can be a little complicated and is the sole reason I will be breaking it into two different posts. Complete Source Code is at the bottom.

  • Create a layout of the type CheckedTextView and paste the code below, there.
  • Create a layout for the Activity and insert 1 Edit Text and 7 Text Views in it. Also insert a button at the bottom. We will have the weekdays as our List View Items.
  • The button will trigger whatever you want to do with the selected items – whether you want to switch over to the next activity or finish the activity etc.
  • We will be creating something resembling a course schedule.
  • Switch over to the Java file and copy-paste the code from the Complete Source Code below.
  • Since the source code is complicated, I provide explanations below. If you fail to understand something, the next post will answer your questions.

Understanding the Code

  • I have used an ArrayList instead of a simple array. For those who are unfamiliar with this class, it provides a linked implementation for Double Dimensional arrays.
  • The initialize() method adds weekdays to the ArrayList.
  • lv.setChoiceMode(ListView.CHOICE_MODE_MULTIPLE) – This statement is responsible for the checkboxes. If we wanted radio buttons, all we need to do is replace CHOICE_MODE_MULTIPLE with CHOICE_MODE_SINGLE.
  • We then, set the Adapter and define the onClick() method for the button.

COMPLETE SOURCE CODE

row_item.xml

<?xml version="1.0" encoding="utf-8"?>
<CheckedTextView xmlns:android="http://schemas.android.com/apk/res/android"
    android:id="@+id/checkedtextview"
    android:layout_width="fill_parent"
    android:layout_height="?android:attr/listPreferredItemHeight"
    android:checkMark="?android:attr/listChoiceIndicatorMultiple"
    android:gravity="center_vertical"
    android:orientation="vertical"
    android:paddingBottom="10dip"
    android:paddingLeft="20dip"
    android:paddingRight="20dip"
    android:paddingTop="10dip"
    android:textColor="#000000"

    android:onClick="toggle"
    >

</CheckedTextView>

activity_main.xml

<RelativeLayout xmlns:android="http://schemas.android.com/apk/res/android"
    xmlns:tools="http://schemas.android.com/tools"
    android:layout_width="match_parent"
    android:layout_height="match_parent"
    android:paddingBottom="@dimen/activity_vertical_margin"
    android:paddingLeft="@dimen/activity_horizontal_margin"
    android:paddingRight="@dimen/activity_horizontal_margin"
    android:paddingTop="@dimen/activity_vertical_margin"
    android:background="#D0D0D0" >

    <Button
        android:id="@+id/addcourse"
        android:layout_width="match_parent"
        android:layout_height="wrap_content"
        android:layout_alignParentBottom="true"
        android:layout_centerHorizontal="true"
        android:text="Go" />
    
    <EditText
        android:id="@+id/coursenameet"
        android:layout_width="match_parent"
        android:layout_height="wrap_content"
        android:layout_alignParentTop="true"
        android:layout_centerHorizontal="true"
        android:ems="10"
        android:layout_marginBottom="2dp"
        android:layout_marginTop="2dp"
        android:hint="Course Name" 
        android:inputType="textCapWords" >

    </EditText>
    
    <View
        android:id="@+id/divider"
        android:layout_width="match_parent"
        android:layout_height="3dp"
        android:layout_below="@+id/coursenameet"
        android:layout_marginBottom="5dp"
        android:layout_marginTop="5dp"
        android:background="@android:color/darker_gray" >
    </View>
    
    <TextView
        android:id="@+id/weekdaytv"
        android:layout_width="wrap_content"
		android:layout_height="wrap_content"
        android:layout_below="@+id/divider"
        android:layout_marginBottom="3dp"
        android:layout_marginTop="3dp"
        android:layout_centerHorizontal="true"
        android:text="Select weekdays for this Course" >
    </TextView>
    
    <RelativeLayout 
    	android:id="@+id/rlinner"
    	android:layout_width="match_parent"
    	android:layout_height="match_parent"
    	android:layout_centerVertical="true"
    	android:layout_centerHorizontal="true"  
    	android:layout_above="@+id/addcourse"
	    android:layout_below="@+id/weekdaytv">
	    
        <RelativeLayout 
	    	android:id="@+id/rlinnermost"
	    	android:layout_width="match_parent"
	    	android:layout_height="wrap_content"
	    	android:layout_centerVertical="true"
	    	android:layout_centerHorizontal="true" >
    	
		    <ListView
		        android:id="@+id/listView1"
		        android:layout_width="match_parent"
		        android:layout_height="wrap_content"
		        android:divider="#FFFFFF"
		    	android:dividerHeight="2dp" />
	    </RelativeLayout>
    	
	</RelativeLayout>

</RelativeLayout>

MainActivity.java

[java]
package com.nero.myfirstapp;

import java.util.ArrayList;

import android.app.Activity;
import android.database.Cursor;
import android.os.Bundle;
import android.view.View;
import android.view.View.OnClickListener;
import android.widget.AdapterView;
import android.widget.AdapterView.OnItemClickListener;
import android.widget.Button;
import android.widget.EditText;
import android.widget.ListView;
import android.widget.Toast;

public class Main extends Activity {
ArrayList weekdays = new ArrayList();
ArrayList ret = new ArrayList();
ListView lv;
EditText coursename;
Button addcourse;
Adapter adapter;
String c;
long courseid;

public void initialize(){
weekdays.add(“Monday”);weekdays.add(“Tuesday”);weekdays.add(“Wednesday”);
weekdays.add(“Thursday”);weekdays.add(“Friday”);weekdays.add(“Saturday”);
}

public void getoldweekdays(long id){
ret.clear();
}

@Override
protected void onCreate(Bundle savedInstanceState) {
super.onCreate(savedInstanceState);
setContentView(R.layout.activity_main);
ret.clear();
initialize();
lv = (ListView) findViewById(R.id.listView1);
coursename = (EditText) findViewById(R.id.coursenameet);
addcourse = (Button) findViewById(R.id.addcourse);
lv.setChoiceMode(ListView.CHOICE_MODE_MULTIPLE);

courseid = getIntent().getLongExtra(“courseid”, -1);
adapter = new Adapter(this, R.layout.row_item, R.id.checkedtextview, weekdays);
lv.setAdapter(adapter);
for(int i=0;i<ret.size();i++)lv.setItemChecked(ret.get(i), true);

lv.setOnItemClickListener(new OnItemClickListener() {
@Override
public void onItemClick(AdapterView<?> parent, View view, int position, long id) {
adapter.toggle(position);
}
});

addcourse.setOnClickListener(new OnClickListener() {

@Override
public void onClick(View arg0) {
ArrayList checkeditem = adapter.getCheckedItems();
finish();
}
});
}
}
[/java]

Context Menus is List View using Simple Cursor Adapter

You have already seen how Context Menus work with ArrayAdapter. In case of SimpleCursorAdapter there are a few methods that can be used in order to retrieve the data about the item that is being clicked. This process is a bit different from the one we have already seen. I provide below the Source Code for doing the same.

Again, the Source Code is changed only in the MainActivity.java file. The rest of the codes namely DatabaseHelper.java, activity_main.xml, row_item.xml remain the same.

MainActivity.java

[java]
package com.nero.myfirstapp;

import java.io.BufferedReader;
import java.io.InputStreamReader;
import java.net.URL;
import java.net.URLConnection;
import android.media.MediaPlayer;
import android.os.Bundle;
import android.preference.PreferenceManager;
import android.provider.ContactsContract;
import android.provider.ContactsContract.PhoneLookup;
import android.app.Activity;
import android.app.AlertDialog;
import android.app.Dialog;
import android.app.ListActivity;
import android.app.ProgressDialog;
import android.content.ContentResolver;
import android.content.DialogInterface;
import android.content.Intent;
import android.content.SharedPreferences;
import android.database.Cursor;
import android.database.sqlite.SQLiteDatabase;
import android.support.v4.widget.SimpleCursorAdapter;
import android.util.Log;
import android.view.ContextMenu;
import android.view.LayoutInflater;
import android.view.Menu;
import android.view.MenuItem;
import android.view.View;
import android.view.ContextMenu.ContextMenuInfo;
import android.view.View.OnClickListener;
import android.widget.AdapterView;
import android.widget.AdapterView.AdapterContextMenuInfo;
import android.widget.AdapterView.OnItemClickListener;
import android.widget.ArrayAdapter;
import android.widget.Button;
import android.widget.EditText;
import android.widget.ListView;
import android.widget.TextView;
import android.widget.Toast;

public class Main extends ListActivity {
DatabaseHelper db;
SimpleCursorAdapter dataAdapter;
@Override
protected void onCreate(Bundle savedInstanceState) {
super.onCreate(savedInstanceState);
setContentView(R.layout.activity_main);
db = new DatabaseHelper(Main.this);
displayList();
}

public void displayList(){
db.InsertValues();
Cursor cursor=db.GetAllData();
String from [] = new String[]{db.colName,db.colAge};
int to [] = new int[] {R.id.textView1,R.id.textView2};
dataAdapter = new SimpleCursorAdapter(this, R.layout.row_item, cursor, from, to, 0);
db.close();

ListView lv = getListView();
lv.setAdapter(dataAdapter);
registerForContextMenu(lv);
}

public void onCreateContextMenu(ContextMenu menu, View v, ContextMenuInfo menuInfo){
ListView lv = (ListView) v;
AdapterView.AdapterContextMenuInfo info = (AdapterView.AdapterContextMenuInfo)menuInfo;
Cursor cursor = (Cursor) lv.getItemAtPosition(info.position);
final int title = cursor.getInt(cursor.getColumnIndex(“_id”));
menu.setHeaderTitle(title);
menu.add(0, v.getId(), 0, “Edit”);
menu.add(0, v.getId(), 0, “Delete”);
}

public boolean onContextItemSelected(MenuItem item){
if(item.getTitle()==”Edit”)Toast.makeText(getApplicationContext(), “Edit Clicked”, Toast.LENGTH_LONG).show();
if(item.getTitle()==”Delete”)Toast.makeText(getApplicationContext(), “Delete Clicked”, Toast.LENGTH_LONG).show();
return true;
}
}
[/java]

List View using Simple Cursor Adapter – Part II

In the last post, I showed you how to populate a ListView from the data present at any time in a database. We used a separate XML for defining the layout of a single row in ListView. However, in the last post the exact application of this XML file was not shown.

In this post I’ll provide you with the Source code to have more than one row inside a single row in a ListView. Here I’ve used two. You can use as many as you like.
The Source code has a few changes, but they can be easily understood. Also the activity_main.xml and DatabaseHelper.java file do not contain any changes.

Cursor

row_item.xml

<?xml version="1.0" encoding="utf-8"?>
<RelativeLayout xmlns:android="http://schemas.android.com/apk/res/android"
    android:layout_width="match_parent"
    android:layout_height="match_parent" >

    <TextView
        android:id="@+id/textView1"
        android:layout_width="wrap_content"
        android:layout_height="wrap_content"
        android:layout_alignParentLeft="true"
        android:layout_alignParentTop="true"
        android:text="Large Text"
        android:textAppearance="?android:attr/textAppearanceLarge" />

    <TextView
        android:id="@+id/textView2"
        android:layout_width="wrap_content"
        android:layout_height="wrap_content"
        android:layout_alignParentLeft="true"
        android:layout_below="@+id/textView1"
        android:text="Small Text"
        android:textAppearance="?android:attr/textAppearanceSmall" />

</RelativeLayout>

MainActivity.java

[java]
package com.nero.myfirstapp;

import java.io.BufferedReader;
import java.io.InputStreamReader;
import java.net.URL;
import java.net.URLConnection;
import android.media.MediaPlayer;
import android.os.Bundle;
import android.preference.PreferenceManager;
import android.provider.ContactsContract;
import android.provider.ContactsContract.PhoneLookup;
import android.app.Activity;
import android.app.AlertDialog;
import android.app.Dialog;
import android.app.ListActivity;
import android.app.ProgressDialog;
import android.content.ContentResolver;
import android.content.DialogInterface;
import android.content.Intent;
import android.content.SharedPreferences;
import android.database.Cursor;
import android.database.sqlite.SQLiteDatabase;
import android.support.v4.widget.SimpleCursorAdapter;
import android.util.Log;
import android.view.ContextMenu;
import android.view.LayoutInflater;
import android.view.Menu;
import android.view.MenuItem;
import android.view.View;
import android.view.ContextMenu.ContextMenuInfo;
import android.view.View.OnClickListener;
import android.widget.AdapterView;
import android.widget.AdapterView.AdapterContextMenuInfo;
import android.widget.AdapterView.OnItemClickListener;
import android.widget.ArrayAdapter;
import android.widget.Button;
import android.widget.EditText;
import android.widget.ListView;
import android.widget.TextView;
import android.widget.Toast;

public class Main extends ListActivity {
DatabaseHelper db;
SimpleCursorAdapter dataAdapter;
@Override
protected void onCreate(Bundle savedInstanceState) {
super.onCreate(savedInstanceState);
setContentView(R.layout.activity_main);
db = new DatabaseHelper(Main.this);
displayList();
}

public void displayList(){
db.InsertValues();
Cursor cursor=db.GetAllData();
String from [] = new String[]{db.colName,db.colAge};
int to [] = new int[] {R.id.textView1,R.id.textView2};
dataAdapter = new SimpleCursorAdapter(this, R.layout.row_item, cursor, from, to, 0);
db.close();

ListView lv = getListView();
lv.setAdapter(dataAdapter);
}
}
[/java]

List View using SimpleCursorAdapter – Part I

Till now we have been populating our List View with a predefined String array using the ArrayAdapter class of Java. Practically, a predefined array is hardly, if ever, used. Most of the times you would want to populate the List View using the data in your Databases. This is precisely what you see in the Contacts list of your phone. Once you add a contact, it is stored in a database and when you open the Contacts list, the list is populated from the data in the database.

Since, here we will be extracting data from our Database, we definitely ill not be using ArrayAdapter. For this we will use SimpleCursorAdapter class. SimpleCursorAdapter just like ArrayAdapter  helps in bridging the data repository to the UI. Remember that as I said earlier there are many ways to populate the ListView. Here I am going to show you one of the most customizable ways around.

So start off an activity and follow along. Complete Source Code is at the bottom.

  • Create the XML layout for the activity and insert a ListView in it.
  • Create another XML named row_item.xml. We will define the layout for a single row in the ListView. Insert a single TextView here and nothing more.
  • Remember that this is one method of doing things. This keeps your ListView customizable to the the single row.
  • Create a new class in your application. Name it DatabaseHelper.java. It will extend SQLiteOpenHelper and will contain all required methods. If you do not know how to do this refer to one of my previous posts here.
  • Also create two static string variables named colName and colAge with values “_id” and “Age” respectively. These will be the names of the columns in our table. (See Source Code for details.)
  • Switch over to the Java file. We will be extending ListActivity.
  • Declare an object of the DatabaseHelper class and SimpleCursorAdapter class globally i.e. inside the class and outside all the methods.
  • Create a new method displayList(). Within this method we need to insert the values in the Database and retrieve all the data from the database.  Write the following lines to do this:
    [java]
    db.InsertValues();
    Cursor cursor=db.GetAllData();
    [/java]
  • Once the data is retrieved, we need to define the source and destination of all the data items. Write the below lines.
    [java]
    String from [] = new String[]{db.colName};
    int to [] = new int[] {R.id.textView1};
    [/java]
  • Now that we have our source and destination for each data item, we need to define the SimpleCursorAdapter.
    [java]
    dataAdapter = new SimpleCursorAdapter(this, R.layout.row_item, cursor, from, to, 0);
    [/java]
  • Now define the ListView and assign the dataAdapter to the ListView.
    [java]
    ListView lv = getListView();
    lv.setAdapter(dataAdapter);
    [/java]
  • Save your work and execute it on an emulator or device.

Array_Adapter3  Array_Adapter2

Understanding the Code

  • The object of the DatabaseHelper class is required because we will need to call the methods and refer to the static variables of that class. Obviously, it cannot be done without objects.
  • Cursor, as I have said in my earlier posts are analogous to a pointer which points to the beginning of the rows returned from a query.
  • The from[ ] and the to[ ] arrays are used to define the source and destination of the data items. It tells Android how and where I want data from my database to be displayed. The actual importance of these will be reflected when we are using more than one row inside a single row of the ListView. I will discuss this in a separate post.
  • The constructor of the SimpleCursorAdapter class used here is
    [java]
    SimpleCursorAdapter(Context context, int layout, Cursor cursor, String from[], int to[], int flags)
    [/java]
  • The above constructor is already comprehensive. We then finally assign the SimpleCursorAdapter to the ListView.

COMPLETE SOURCE CODE

row_item.xml

<?xml version="1.0" encoding="utf-8"?>
<RelativeLayout xmlns:android="http://schemas.android.com/apk/res/android"
    android:layout_width="match_parent"
    android:layout_height="match_parent" >

    <TextView
        android:id="@+id/textView1"
        android:layout_width="wrap_content"
        android:layout_height="wrap_content"
        android:layout_alignParentLeft="true"
        android:layout_alignParentTop="true"
        android:text="Large Text"
        android:textAppearance="?android:attr/textAppearanceLarge" />

</RelativeLayout>

activity_main.xml

<RelativeLayout xmlns:android="http://schemas.android.com/apk/res/android"
    xmlns:tools="http://schemas.android.com/tools"
    android:layout_width="match_parent"
    android:layout_height="match_parent"
    android:paddingBottom="@dimen/activity_vertical_margin"
    android:paddingLeft="@dimen/activity_horizontal_margin"
    android:paddingRight="@dimen/activity_horizontal_margin"
    android:paddingTop="@dimen/activity_vertical_margin" >

    <ListView
        android:id="@+id/android:list"
        android:layout_width="match_parent"
        android:layout_height="wrap_content"
        android:layout_alignParentLeft="true"
        android:layout_alignParentTop="true" >
    </ListView>

</RelativeLayout>

DatabaseHelper.java

[java]
package com.nero.myfirstapp;

import android.content.Context;
import android.database.Cursor;
import android.database.sqlite.SQLiteDatabase;
import android.database.sqlite.SQLiteOpenHelper;

public class DatabaseHelper extends SQLiteOpenHelper {

static String DatabaseName=”NeroDB”;
static String colName=”_id”;
static String colAge=”Age”;

public DatabaseHelper(Context context) {
super(context, DatabaseName, null, 4);
}

@Override
public void onCreate(SQLiteDatabase db) {
db.execSQL(“CREATE TABLE IF NOT EXISTS NeroTable(_id VARCHAR, Age INT(3));”);
}

@Override
public void onUpgrade(SQLiteDatabase db, int oldVersion, int newVersion) {
db.execSQL(“DROP TABLE NeroTable;”);
db.execSQL(“CREATE TABLE IF NOT EXISTS NeroTable(_id VARCHAR, Age INT(3));”);
}

public void InsertValues()
{
SQLiteDatabase db = this.getWritableDatabase();
db.execSQL(“INSERT INTO NeroTable VALUES(‘Vergil’, 20);”);
db.execSQL(“INSERT INTO NeroTable VALUES(‘Dante’, 20);”);
db.execSQL(“INSERT INTO NeroTable VALUES(‘Nero’, 18);”);
db.execSQL(“INSERT INTO NeroTable VALUES(‘Sparda’, 40);”);
db.execSQL(“INSERT INTO NeroTable VALUES(‘Arkham’, 38);”);
db.execSQL(“INSERT INTO NeroTable VALUES(‘Agni’, 35);”);
db.execSQL(“INSERT INTO NeroTable VALUES(‘Rudra’, 35);”);
db.execSQL(“INSERT INTO NeroTable VALUES(‘Beowulf’, 60);”);
db.execSQL(“INSERT INTO NeroTable VALUES(‘Nevan’, 26);”);
db.close();
}

public Cursor GetAllData()
{
SQLiteDatabase db = this.getReadableDatabase();
Cursor c = db.rawQuery(“SELECT * FROM NeroTable;”, null);
return c;
}

public void DeleteTable()
{
SQLiteDatabase db = this.getWritableDatabase();
db.execSQL(“DROP TABLE NeroTable;”);
}
}

[/java]

MainActivity.java

[java]
package com.nero.myfirstapp;

import java.io.BufferedReader;
import java.io.InputStreamReader;
import java.net.URL;
import java.net.URLConnection;
import android.media.MediaPlayer;
import android.os.Bundle;
import android.preference.PreferenceManager;
import android.provider.ContactsContract;
import android.provider.ContactsContract.PhoneLookup;
import android.app.Activity;
import android.app.AlertDialog;
import android.app.Dialog;
import android.app.ListActivity;
import android.app.ProgressDialog;
import android.content.ContentResolver;
import android.content.DialogInterface;
import android.content.Intent;
import android.content.SharedPreferences;
import android.database.Cursor;
import android.database.sqlite.SQLiteDatabase;
import android.support.v4.widget.SimpleCursorAdapter;
import android.util.Log;
import android.view.ContextMenu;
import android.view.LayoutInflater;
import android.view.Menu;
import android.view.MenuItem;
import android.view.View;
import android.view.ContextMenu.ContextMenuInfo;
import android.view.View.OnClickListener;
import android.widget.AdapterView;
import android.widget.AdapterView.AdapterContextMenuInfo;
import android.widget.AdapterView.OnItemClickListener;
import android.widget.ArrayAdapter;
import android.widget.Button;
import android.widget.EditText;
import android.widget.ListView;
import android.widget.TextView;
import android.widget.Toast;

public class Main extends ListActivity {
DatabaseHelper db;
SimpleCursorAdapter dataAdapter;
@Override
protected void onCreate(Bundle savedInstanceState) {
super.onCreate(savedInstanceState);
setContentView(R.layout.activity_main);
db = new DatabaseHelper(Main.this);
displayList();
}

public void displayList(){
db.InsertValues();
Cursor cursor=db.GetAllData();
String from [] = new String[]{db.colName};
int to [] = new int[] {R.id.textView1};
dataAdapter = new SimpleCursorAdapter(this, R.layout.row_item, cursor, from, to, 0);
db.close();

ListView lv = getListView();
lv.setAdapter(dataAdapter);
}
}
[/java]

Adding Long Click functionality in List View – Context Menus Clicks

Now that we are familiar with long clicks and Context Menus that are triggered by them, we must understand that Context Menus are but a kind of menu and just like any other type of menu, their items too are clickable. In fact, if there were no such options the whole purpose of displaying a menu is defeated.

In this post I will show you how to handle clicks on the Context Menu which is a rather simple task. All we need to do is add another method. Complete Source Code is at the bottom.

  • Create the layout of the activity and insert a ListView into it.
  • Switch over to the java file and declare the List View. Create the string array to populate the list.
  • Declare and assign the ArrayAdapter to the ListView.
  • Register the List View for Context Menu and create the method onCreateContextMenu(). Add the two menu items Edit and Delete.
  • Now just after the onCreateContextMenu() method we define another method on:
    [java]
    public boolean onContextItemSelected(MenuItem item){
    if(item.getTitle()==”Edit”)Toast.makeText(getApplicationContext(), “Edit Clicked”, Toast.LENGTH_LONG).show();
    if(item.getTitle()==”Delete”)Toast.makeText(getApplicationContext(), “Delete Clicked”, Toast.LENGTH_LONG).show();
    return true;
    }
    [/java]
  • Save your work and execute it on the device or the emulator.
  • I am just displaying a Toast on the click of the Context Menu item. You can choose to do whatever you want.

LongClick1  LongClick2

COMPLETE SOURCE CODE

activity_main.xml

<RelativeLayout xmlns:android="http://schemas.android.com/apk/res/android"
    xmlns:tools="http://schemas.android.com/tools"
    android:layout_width="match_parent"
    android:layout_height="match_parent"
    android:paddingBottom="@dimen/activity_vertical_margin"
    android:paddingLeft="@dimen/activity_horizontal_margin"
    android:paddingRight="@dimen/activity_horizontal_margin"
    android:paddingTop="@dimen/activity_vertical_margin" >
 
    <ListView
        android:id="@+id/android:list"
        android:layout_width="match_parent"
        android:layout_height="wrap_content"
        android:layout_alignParentLeft="true"
        android:layout_alignParentTop="true" >
    </ListView>
</RelativeLayout>

MainActivity.java

[java]
package com.nero.myfirstapp;

import java.io.BufferedReader;
import java.io.InputStreamReader;
import java.net.URL;
import java.net.URLConnection;
import android.media.MediaPlayer;
import android.os.Bundle;
import android.preference.PreferenceManager;
import android.provider.ContactsContract;
import android.provider.ContactsContract.PhoneLookup;
import android.app.Activity;
import android.app.AlertDialog;
import android.app.Dialog;
import android.app.ListActivity;
import android.app.ProgressDialog;
import android.content.ContentResolver;
import android.content.DialogInterface;
import android.content.Intent;
import android.content.SharedPreferences;
import android.database.Cursor;
import android.database.sqlite.SQLiteDatabase;
import android.util.Log;
import android.view.ContextMenu;
import android.view.LayoutInflater;
import android.view.Menu;
import android.view.MenuItem;
import android.view.View;
import android.view.ContextMenu.ContextMenuInfo;
import android.view.View.OnClickListener;
import android.widget.AdapterView;
import android.widget.AdapterView.AdapterContextMenuInfo;
import android.widget.AdapterView.OnItemClickListener;
import android.widget.ArrayAdapter;
import android.widget.Button;
import android.widget.EditText;
import android.widget.ListView;
import android.widget.TextView;
import android.widget.Toast;

public class Main extends ListActivity {
@Override
protected void onCreate(Bundle savedInstanceState) {
super.onCreate(savedInstanceState);
setContentView(R.layout.activity_main);
String values[]=new String[]{“Vergil”, “Dante”, “Sparda”, “Nero”, “Arkham”, “Agni”, “Rudra”, “Beowulf”, “Nevan”};
ListView lv = getListView();
ArrayAdapter adapter = new ArrayAdapter(this, android.R.layout.simple_list_item_1, android.R.id.text1,values);
lv.setAdapter(adapter);
registerForContextMenu(lv);

lv.setOnItemClickListener(new OnItemClickListener() {
public void onItemClick(AdapterView<?> parent, View view, int position, long id){
String item = ((TextView)view).getText().toString();
Toast.makeText(getApplicationContext(), “Clicked: “+item, Toast.LENGTH_LONG).show();
}
});
}
public void onCreateContextMenu(ContextMenu menu, View v, ContextMenuInfo menuInfo){
menu.add(0, v.getId(), 0, “Edit”);
menu.add(0, v.getId(), 0, “Delete”);
}

public boolean onContextItemSelected(MenuItem item){
if(item.getTitle()==”Edit”)Toast.makeText(getApplicationContext(), “Edit Clicked”, Toast.LENGTH_LONG).show();
if(item.getTitle()==”Delete”)Toast.makeText(getApplicationContext(), “Delete Clicked”, Toast.LENGTH_LONG).show();
return true;
}
}
[/java]

Adding Long Click functionality in List View – Context Menus

As we saw in the last post, we can easily handle clicks on the list items. However, often times in our applications we would like to have separate genres of options on the click of the the list items if possible. This is where long clicks come into play. Android provides facilities to handle both regular and long clicks by identifying them separately.

Here, I will show you how to use this facility of Android and separately handle clicks. I am creating a menu here on detecting long clicks. You can do a lot more things as and what you feel like. So start off an activity and follow along. Complete Source Code is at the bottom.

  • Create the layout of the activity and insert a ListView into it.
  • Switch over to the java file and declare the List View. Create the string array to populate the list.
  • Declare and assign the ArrayAdapter to the ListView.
  • Just after this assignment we need to register our ListView for Context Menu. Write the below line:
    [java]
    registerForContextMenu(lv);
    [/java]
  • Close the onCreate() method and create a new method:
    [java]
    public void onCreateContextMenu(ContextMenu menu, View v, ContextMenuInfo menuInfo){
    menu.add(0, v.getId(), 0, “Edit”);
    menu.add(0, v.getId(), 0, “Delete”);
    }
    [/java]
  • Here we are going to provide the user with a couple of options of Edit and Delete the entry. Of course, we are not going to perform these actions here. This is just for demonstration purposes.
  • Save your work and execute it on an emulator or device.

LongClick

Understanding the Code:

  • The menu.add() method we are using here has a constructor add(int groupId, int itemId, int order, CharSequence title).
  • We are providing a value of 0 for both groupId and order. We however are giving each item an itemId which we derive easily from the view argument to the method.

COMPLETE SOURCE CODE

activity_main.xml

<RelativeLayout xmlns:android="http://schemas.android.com/apk/res/android"
    xmlns:tools="http://schemas.android.com/tools"
    android:layout_width="match_parent"
    android:layout_height="match_parent"
    android:paddingBottom="@dimen/activity_vertical_margin"
    android:paddingLeft="@dimen/activity_horizontal_margin"
    android:paddingRight="@dimen/activity_horizontal_margin"
    android:paddingTop="@dimen/activity_vertical_margin" >

    <ListView
        android:id="@+id/android:list"
        android:layout_width="match_parent"
        android:layout_height="wrap_content"
        android:layout_alignParentLeft="true"
        android:layout_alignParentTop="true" >
    </ListView>
</RelativeLayout>

MainActivity.java

[java]
package com.nero.myfirstapp;

import java.io.BufferedReader;
import java.io.InputStreamReader;
import java.net.URL;
import java.net.URLConnection;
import android.media.MediaPlayer;
import android.os.Bundle;
import android.preference.PreferenceManager;
import android.provider.ContactsContract;
import android.provider.ContactsContract.PhoneLookup;
import android.app.Activity;
import android.app.AlertDialog;
import android.app.Dialog;
import android.app.ListActivity;
import android.app.ProgressDialog;
import android.content.ContentResolver;
import android.content.DialogInterface;
import android.content.Intent;
import android.content.SharedPreferences;
import android.database.Cursor;
import android.database.sqlite.SQLiteDatabase;
import android.util.Log;
import android.view.ContextMenu;
import android.view.LayoutInflater;
import android.view.Menu;
import android.view.MenuItem;
import android.view.View;
import android.view.ContextMenu.ContextMenuInfo;
import android.view.View.OnClickListener;
import android.widget.AdapterView;
import android.widget.AdapterView.OnItemClickListener;
import android.widget.ArrayAdapter;
import android.widget.Button;
import android.widget.EditText;
import android.widget.ListView;
import android.widget.TextView;
import android.widget.Toast;

public class Main extends ListActivity {
@Override
protected void onCreate(Bundle savedInstanceState) {
super.onCreate(savedInstanceState);
setContentView(R.layout.activity_main);
String values[]=new String[]{“Vergil”, “Dante”, “Sparda”, “Nero”, “Arkham”, “Agni”, “Rudra”, “Beowulf”, “Nevan”};
ListView lv = getListView();
ArrayAdapter adapter = new ArrayAdapter(this, android.R.layout.simple_list_item_1, android.R.id.text1,values);
lv.setAdapter(adapter);
registerForContextMenu(lv);

lv.setOnItemClickListener(new OnItemClickListener() {
public void onItemClick(AdapterView<?> parent, View view, int position, long id){
String item = ((TextView)view).getText().toString();
Toast.makeText(getApplicationContext(), “Clicked: “+item, Toast.LENGTH_LONG).show();
}
});
}
public void onCreateContextMenu(ContextMenu menu, View v, ContextMenuInfo menuInfo){
menu.add(0, v.getId(), 0, “Edit”);
menu.add(0, v.getId(), 0, “Delete”);
}
}
[/java]

Adding Click functionality in List View – onItemClickListener()

In the previous posts we saw how we can, in a number of ways populate out List Views. However, most of the times just populating and displaying List Views aren’t enough. You must have seen that in most of the applications, we can click the items of the List View and that brings up an array of options that the programmer has programmed. We are going to learn how to add the click functionality to our List View.

Remember that the functionality described here will work in exactly in the same manner irrespective of whether it is a long click or a regular click. I will show you how to add the Long Click functionality in the list item in a separate post.
So start up an activity and follow along. Complete Source Code is at the bottom.

  • We are going to be working with ArrayAdapters just as we have been doing in the previous posts. The process of adding the click functionality remain the same even if you choose to use a different kind of adapter.
  • In the XML file of the activity, add the list view and switch to the MainActivity.java file. The source code at the bottom extends the MainActivity from ListActivity, but you can extend Activity just as I had shown you in the first post on List Views.
  • Set up the ArrayAdapter and assign it to the ListView.
  • Just after that, add the following code:
    [java]
    lv.setOnItemClickListener(new OnItemClickListener() {
    public void onItemClick(AdapterView<?> parent, View view, int position, long id){
    String item = ((TextView)view).getText().toString();
    Toast.makeText(getApplicationContext(), “Clicked: “+item, Toast.LENGTH_LONG).show();
    }
    });
    [/java]
  • Save your work and execute it on an emulator or a device.

Click1    Click2

Understanding the Code

  • A careful examination of code shows that it itself is comprehensive enough.
  • AdapterView<?> parent is the parent Adapter view i.e. it refers to the complete section where the Adapter is used.
  • View view is the specific view which we are clicking at the moment, in this case the element we are clicking.
  • int position gives the position of the view under consideration, in this case the element clicked.
  • long id gives the id of the clicked element.
  • Here, I’ve shown you a very basic example of how to handle clicks by using Toast. You can create dialogs, alert boxes or switch to entire new activities if you want to. Refer to my previous posts and apply the concept discussed here.

COMPLETE SOURCE CODE

activity_main.xml

<RelativeLayout xmlns:android="http://schemas.android.com/apk/res/android"
    xmlns:tools="http://schemas.android.com/tools"
    android:layout_width="match_parent"
    android:layout_height="match_parent"
    android:paddingBottom="@dimen/activity_vertical_margin"
    android:paddingLeft="@dimen/activity_horizontal_margin"
    android:paddingRight="@dimen/activity_horizontal_margin"
    android:paddingTop="@dimen/activity_vertical_margin" >

    <ListView
        android:id="@+id/android:list"
        android:layout_width="match_parent"
        android:layout_height="wrap_content"
        android:layout_alignParentLeft="true"
        android:layout_alignParentTop="true" >
    </ListView>

</RelativeLayout>

MainActivity.java

[java]
package com.nero.myfirstapp;

import java.io.BufferedReader;
import java.io.InputStreamReader;
import java.net.URL;
import java.net.URLConnection;
import android.media.MediaPlayer;
import android.os.Bundle;
import android.preference.PreferenceManager;
import android.provider.ContactsContract;
import android.provider.ContactsContract.PhoneLookup;
import android.app.Activity;
import android.app.AlertDialog;
import android.app.Dialog;
import android.app.ListActivity;
import android.app.ProgressDialog;
import android.content.ContentResolver;
import android.content.DialogInterface;
import android.content.Intent;
import android.content.SharedPreferences;
import android.database.Cursor;
import android.database.sqlite.SQLiteDatabase;
import android.util.Log;
import android.view.LayoutInflater;
import android.view.Menu;
import android.view.MenuItem;
import android.view.View;
import android.view.View.OnClickListener;
import android.widget.AdapterView;
import android.widget.AdapterView.OnItemClickListener;
import android.widget.ArrayAdapter;
import android.widget.Button;
import android.widget.EditText;
import android.widget.ListView;
import android.widget.TextView;
import android.widget.Toast;

public class Main extends ListActivity {
@Override
protected void onCreate(Bundle savedInstanceState) {
super.onCreate(savedInstanceState);
setContentView(R.layout.activity_main);
String values[]=new String[]{“Vergil”, “Dante”, “Sparda”, “Nero”, “Arkham”, “Agni”, “Rudra”, “Beowulf”, “Nevan”};
ListView lv = getListView();
ArrayAdapter<String> adapter = new ArrayAdapter<String>(this, android.R.layout.simple_list_item_1, android.R.id.text1,values);
lv.setAdapter(adapter);

lv.setOnItemClickListener(new OnItemClickListener() {
public void onItemClick(AdapterView<?> parent, View view, int position, long id){
String item = ((TextView)view).getText().toString();
Toast.makeText(getApplicationContext(), “Clicked: “+item, Toast.LENGTH_LONG).show();
}
});
}
}
[/java]

List View using Array Adapters – Part III : Using Custom Row Layouts

Till now we have been using Android’s default row layout for populating the ListView. It might sometimes become necessary to use one that satisfies our needs, thereby creating a custom row layout. As I had said in my earlier posts that there are a number of ways f implementing List views, we are going to use one here that allows use of custom layout for every single row of the list view.

Since this is just another way of implementing, I will just provide a few points of difference worth noting from earlier implementations and the complete source code

  • We will be extending the ListActivity class here
  • We will not be using the setContentView() method here. This tells Android that we need only a List view in our activity spanning across the entire size.
  • We will also not be declaring the ListView here for the same reason.
  • We will assign the adapter to the ListView with the use of this keyword. See below for implementation

Array_Adapter3

COMPLETE SOURCE CODE

row_item.xml

<?xml version="1.0" encoding="utf-8"?>
<RelativeLayout xmlns:android="http://schemas.android.com/apk/res/android"
    android:layout_width="match_parent"
    android:layout_height="match_parent" >

    <TextView
        android:id="@+id/textView1"
        android:layout_width="wrap_content"
        android:layout_height="wrap_content"
        android:layout_alignParentLeft="true"
        android:layout_alignParentTop="true"
        android:text="TextView"
        android:paddingLeft="10dip"
        android:paddingTop="25dip"
        android:paddingBottom="10dip" 
        android:textSize="20dip"/>

</RelativeLayout>

MainActivity.java

[java]
package com.nero.myfirstapp;

import java.io.BufferedReader;
import java.io.InputStreamReader;
import java.net.URL;
import java.net.URLConnection;
import android.media.MediaPlayer;
import android.os.Bundle;
import android.preference.PreferenceManager;
import android.provider.ContactsContract;
import android.provider.ContactsContract.PhoneLookup;
import android.app.Activity;
import android.app.AlertDialog;
import android.app.Dialog;
import android.app.ListActivity;
import android.app.ProgressDialog;
import android.content.ContentResolver;
import android.content.DialogInterface;
import android.content.Intent;
import android.content.SharedPreferences;
import android.database.Cursor;
import android.database.sqlite.SQLiteDatabase;
import android.util.Log;
import android.view.ContextMenu;
import android.view.LayoutInflater;
import android.view.Menu;
import android.view.MenuItem;
import android.view.View;
import android.view.ContextMenu.ContextMenuInfo;
import android.view.View.OnClickListener;
import android.widget.AdapterView;
import android.widget.AdapterView.AdapterContextMenuInfo;
import android.widget.AdapterView.OnItemClickListener;
import android.widget.ArrayAdapter;
import android.widget.Button;
import android.widget.EditText;
import android.widget.ListView;
import android.widget.TextView;
import android.widget.Toast;

public class Main extends ListActivity {
@Override
protected void onCreate(Bundle savedInstanceState) {
super.onCreate(savedInstanceState);
String values[]=new String[]{“Vergil”, “Dante”, “Sparda”, “Nero”, “Arkham”, “Agni”, “Rudra”, “Beowulf”, “Nevan”};
this.setListAdapter(new ArrayAdapter(this, R.layout.row_item, R.id.textView1,values));
}
}
[/java]

Doubly Linked Lists

A doubly linked list is a linked linear data structure,each node of which has one or more data fields but only two link fields known as left link (LLINK) and right link (RLINK).The LLINK field of a given node points to the node on its left and RLINK field of a given node points to the node on its right.

Advantages-

1.The availability of two links LLINK and RLINK permit forward and backward movement during the processing of the list.
2.The deletion of a node X from the list requires only the value of X.
3.Efficiency of operations like insertion,deletion,etc increases.

Disadvantage-

1.Each node needs two links which can be considered expensive storage-wise when compared to singly linked lists.

Operations-

Insertion-

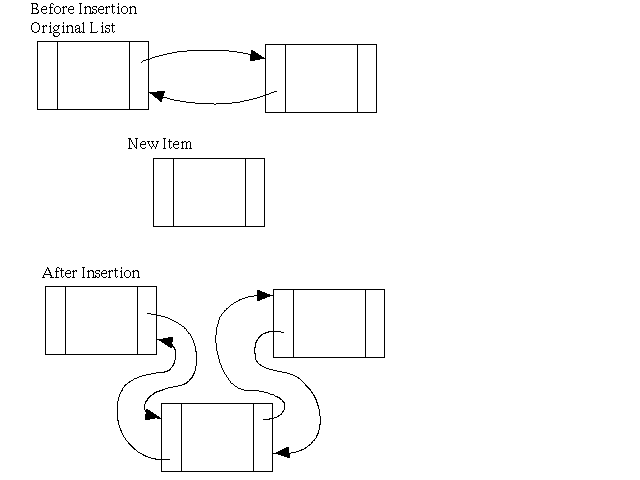
To insert node X to the right of node Y in a headed circular doubly linked list P-

[cpp]

INSERT (X,Y)

LLINK(X)=Y;
RLINK(X)=RLINK(Y);
LLINK(RLINK(Y))=X;
RLINK(Y)=X;

END
[/cpp]

insertion

Deletion-

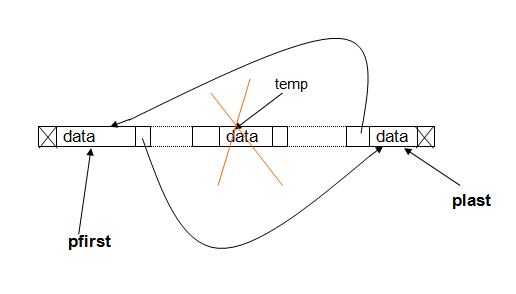
To delete node X from a headed circular doubly linked list P-

[cpp]

DELETE (P,X)

RLINK(LLINK(X))=RLINK(X);
LLINK(RLINK(X))=LLINK(X);

END

[/cpp]

deletion

Linked Lists

Linked list is one of the fundamental,simplest and most common data structures in C programming language.A linked list is a data structure consisting of a group of nodes which together represent a sequence.Each node comprises of data and a link to the next node in the sequence.

Advantages of Linked List over an array-

1.Linked list is a dynamic data structure whose length can be increased or decreased at run time.An array is a static data structure that is length of array cannot be altered at run time.

2.In an array, all the elements are kept at consecutive memory locations while in a linked list the elements (or nodes) may be kept at any location but still connected to each other through pointers.The list elements can easily be inserted or removed without reallocation or reorganization of the entire structure because the data items need not be stored contiguously in memory or on disk.

3.Linked lists are preferred mostly when we don’t know the volume of data to be stored.

Creating a Linked List-

A block in a linked list is represented through a structure-

typedef struct node_type
{

int data;
struct node_type *link;

} node;

The value ‘data’ can be any value while the pointer ‘link’ contains the address of next block of this linked list.
The ‘next’ pointer of the last node would contain a NULL.

A node is created by allocating memory to a structure in the following way-

struct node_type *ptr = (struct node_type*)malloc(sizeof(struct node_type));

The pointer ‘ptr’ now contains address of a newly created node.

To assign a value to the node-

ptr->val = data;

To assign its next pointer,the address of next node-

ptr->next = NULL;

The first node of the list is known as head node.

Algorithm-

//initialization

head->data=X;
head->next=NULL;

PROCEDURE-

//let the new node be temp
//inserted at the beginning

temp->data=X;
temp->next=head;

head=temp;

REPEAT PROCEDURE

Code-

[cpp]

//Insertion at the beginning of the list

typedef struct node_type
{

int data;
struct node_type *link;

} node;

typedef node *list;

list head;

//value to be entered in the list is dat which is the input

scanf(“%d”,&dat);

//creating the first node

head=(list)malloc(sizeof(node));

head->data = dat;
head->link=NULL;

list temp;

//dat!=99 denotes stopping condition

while(dat!=99)
{
scanf(“%d”,&dat);

//creating node
temp=(list)malloc(sizeof(node));

temp->data=dat;
temp->link=head;

//since inserted at the beginning
// the new node will become the head

head=temp;

}

//Printing the list

temp=head; //initialization

while(temp!=NULL)
{
printf(“%d “,temp->data);

//going to next node
temp=temp->next;
}

[/cpp]