Accounting is supposed to reflect reality. Yet, the modern double-entry system often asks us to ignore common sense. In this post, we explore the absurdities of the Western model, its forgotten Indian roots, and why it’s time to build systems that honor both logic and legacy.
In the world of finance and accounting, there are few systems as universally entrenched as the double-entry bookkeeping system. Taught in every business school and embedded in every ERP software, it’s hailed as the gold standard of financial integrity and balance. But beneath its structured columns and polished jargon lies an inconvenient truth: the double-entry system, as formalized in the West, is needlessly counterintuitive.
A System That Punishes Intuition
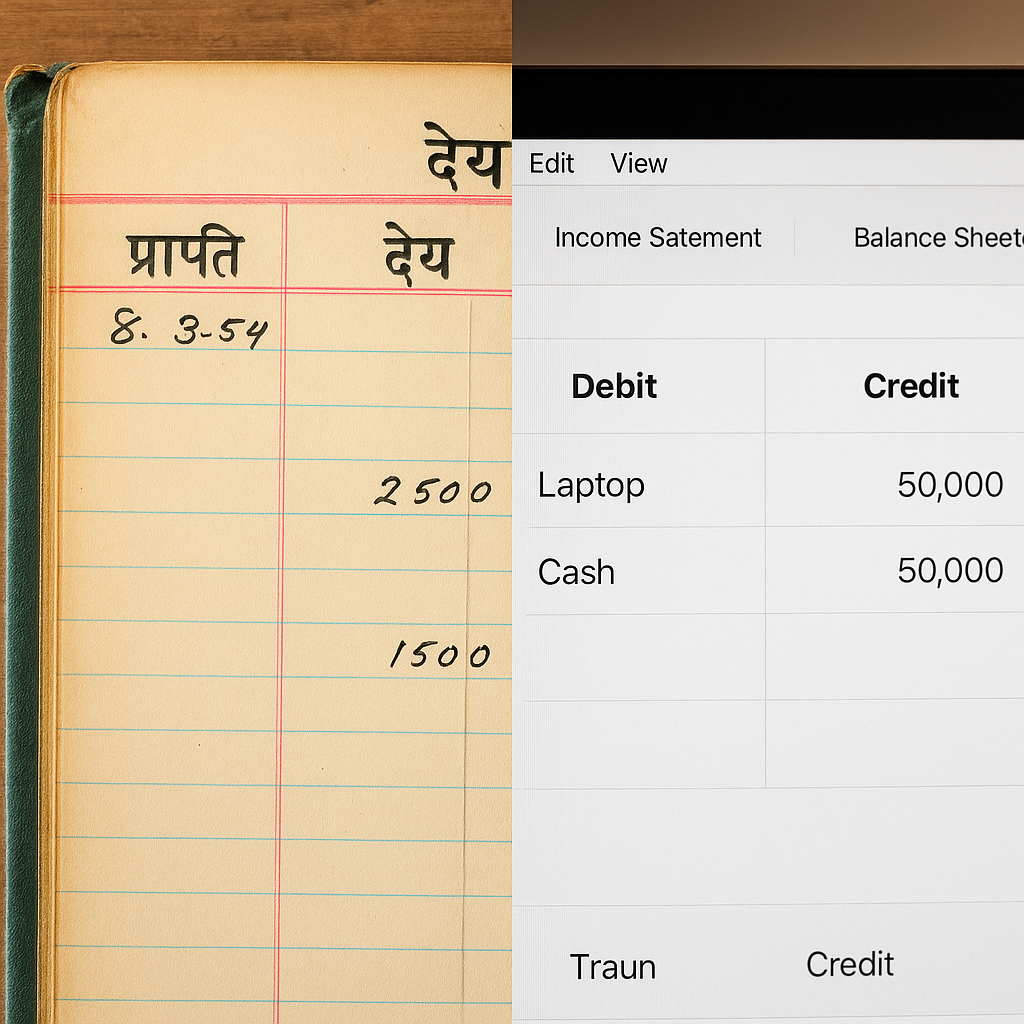
Let’s get to the crux of the absurdity: when a business acquires a laptop, the accountant is expected to debit the laptop account and credit cash. Intuitively, this makes no sense to the average person. One might naturally think:
“I gained a laptop, shouldn’t that be a positive entry? I lost money, shouldn’t that be a negative one?”
But no — in the Western formalization, you must first memorize a matrix of account types and their behaviors:
Account Type
Debit Means
Credit Means
Asset
Increase
Decrease
Liability
Decrease
Increase
Income
Decrease
Increase
Expense
Increase
Decrease
Equity
Decrease
Increase
To operate this system, you’re expected to detach from logic and cling to a chart.
But It Didn’t Start This Way
What’s truly ironic is that this system wasn’t even born in the West. Indian merchant communities had well-developed double entry accounting systems centuries before Luca Pacioli ever picked up a pen. These systems, such as “Bahi-Khata” and “Lekha-Jokha,” were intuitive, narrative-based, and required no memorization of abstract roles. They used terms like Jama (प्राप्ति – what is receivable to you) and Udhar (देय – what you owe) — simple, human, understandable.
It was only after Western formalization that accounting became a cold abstraction. Pacioli, a mathematician and priest, didn’t invent double-entry — he codified it in a way that suited the legal and ecclesiastical machinery of Renaissance Italy. But in the process, he stripped it of its cultural intelligence.
The Emperor Has No Ledger
The double-entry system is often praised for its elegance and balance. But elegance is not the same as usability. Systems should not require rote memorization of arbitrary rules just to reflect a transaction as simple as “I bought a thing.”
Modern accounting education forces students to contort their minds around rules that make sense only on paper. When an asset increases, we call it a debit. When money leaves, we call it a credit. But try explaining that to a child, or a farmer, or a shopkeeper — they’ll look at you sideways. And rightly so.
When Software Saves Us from Ourselves
Interestingly, modern accounting tools and platforms are beginning to mask this absurdity by adding a layer of intuitive design. Today’s user interfaces rarely show raw debits and credits. Instead, they ask users what happened:
“Did you purchase something? From where? Using what method?”
Behind the scenes, the software still performs the debit-credit logic — but it no longer asks humans to think like ledgers. Tools like Tally, Zoho Books, QuickBooks, and even personal finance apps present transactions in a way that mirrors natural human thinking: money came in, money went out, you gained an asset, you paid a bill.
In essence, these tools are quietly abstracting away the rigid mechanics and restoring the clarity that the original Indian systems once had. Perhaps they are unknowingly inching closer to the clarity of प्राप्ति-देय.
Time to Reclaim Accounting from Rote Learning
We live in an age of intuitive design. We expect apps, services, and tools to be user-friendly. Why should accounting be stuck in the 15th century?
Perhaps it’s time to return to our roots — not to reject structure, but to rebuild it with clarity. Systems like प्राप्ति-देय (Jama-Udhar), or reimagined versions of them, could provide the intuitive foundation we’ve lost. They’re not only culturally resonant, they’re logically superior for most human contexts.
Final Word
Western double-entry accounting, as it stands today, is a twisted plot built on a beautiful foundation of accounting from India. It’s time to stop pretending this current system is beyond question. It’s not divine, it’s designed — and like all designs, it can be improved.
Let’s stop teaching people to memorize irrational mappings. Let’s build systems that work with our minds, not against them.
Intuition is not the enemy of precision. It’s the path to it.
🧠 Food for Thought: Have you ever felt frustrated trying to “get” accounting? Do you think systems should serve people — not the other way around? Share your thoughts in the comments. Let’s spark a conversation about building better, more intuitive frameworks for the next generation.
In 1899, Max Planck uncovered something timeless: the smallest unit of time that still has physical meaning.
We now call it Planck time:
tP≈5.39×10−44 seconds
It’s unimaginably short — far beyond direct measurement — but incredibly profound.
Because if we treat that as the duration of a single frame of reality, then we’re forced to ask:
Is the universe updating frame by frame?
Reality as a Causal Engine
Let’s follow that thought. If each Planck time is one “tick” of the universal clock, then the frame rate of the universe is:
FPS=tP1≈1.855×1043 frames per second
Yes. Roughly 185 trillion trillion trillion trillion frames per second.
That’s not science fiction. That’s the math baked into physical constants.
And you heard that frame rate here first.
From Time to Space: The Planck Grid
It gets more intriguing when we realize that:
ℓP=c⋅tP
That is, Planck time multiplied by the speed of light gives us Planck length, the smallest measurable unit of space.
So we now have:
A pixel size: 1.616×10⁻³⁵ meters
A frame duration: 5.39×10⁻⁴⁴ seconds
A universal constraint: No signal or event can propagate faster than one pixel per frame.
Which is exactly what we mean by the speed of light.
But maybe we’ve been calling it the wrong thing all along.
It’s the Speed of Events
What we call “c” isn’t about photons. It’s a fundamental limit on how fast any event can ripple through the fabric of spacetime.
Like updates in a distributed system, or signals in a finite-element simulation, every interaction can only spread to adjacent nodes — one at a time — per frame.
In this light (no pun intended), the universe appears less like a smooth continuum, and more like a vast, local-update-driven causal mesh.
Planck gave us the constants. The frame rate, pixel size, and speed limit all emerge from them.
All we’re doing now is connecting the dots.
Why This Matters
This framing — no longer poetic but grounded in physical constants — has implications across:
Quantum gravity
Simulation hypotheses
Discrete spacetime models
Relativistic causality
The intersection of computation and cosmology
It might help explain why spacetime resists division beyond certain limits, why causality holds, and how the “engine” of the cosmos keeps time.
And just maybe, it hints that reality is more digital than continuous.
Next time someone says “the speed of light is the fastest thing in the universe”, you can tell them:
It’s not the speed of light. It’s the speed of reality itself.
And it’s running at ~10⁴³ frames per second.
Intriguing right? And yes, you read the FPS here first.
Deployed systems have a knack for humbling even experienced engineers. You trust your stack—until one morning it silently fails. Last week, during DheeGPT’s development, that exact scenario unfolded and forced us to rethink our infrastructure.
The Day Cassandra Let Us Down
We chose Apache Cassandra to power DheeGPT, our agentic AI engine for Indic languages. It had handled thousands of writes per second in our legacy and production systems — however in the development environment of our newest platform, a routine query returned zero rows:
The data was unquestionably in the table.
A secondary-index query returned no results.
A full table scan confirmed the rows existed—but the index was stale.
No errors. No alerts. Just missing data. Numerous minutes of debugging later, we traced the fault to Cassandra’s secondary index divergence. Invisible failures like this are unacceptable for real-time AI and and automations which are mission critical.
Where Cassandra’s Design Reveals Strain
Cassandra excels as a write-optimized ledger. Yet when you layer on dynamic queries and tight consistency, its limits appear:
Secondary indexes can silently desynchronize.
Rigid schemas force costly refactors if access patterns evolve.
JVM GC pauses inject unpredictable P99 spikes.
As we built DheeGPT, these factors made us question whether Cassandra could sustain our reliability bar.
The Pivot to ScyllaDB During Development
Facing looming deadlines, we swapped in ScyllaDB mid-development. The transition was surprisingly smooth:
Zero code changes — Same CQL, same Spring Data drivers.
C++ Seastar lock-free, thread-per-core design.
Up to 10× throughput on identical hardware.
Sub-10 ms P99 latencies, even under traffic surges.
Though ScyllaDB launched in 2016, it still flies under the radar. License concerns and slower early evangelism held it back—yet today it’s a mature, high-performance alternative.
How DheeYantra Leverages Robust Infra
At DheeYantra, we build Dhee.AI Digital Employees that:
Power 24×7 customer support in Hindi, Tamil, Bengali, and more
Automate document processing and data extraction
Orchestrate workflows across enterprise systems in real time
For us, infrastructure reliability isn’t optional—it’s the core of our product promise. With ScyllaDB, we maintain sub-second response times at scale, reduce cluster size (and costs), and shift focus from firefighting infra to advancing AI logic.
Key Takeaways
Revisit your defaults. Even proven tech can hide silent failure modes.
Decouple API from engine. A compatible interface lets you switch back ends with minimal friction.
Benchmark real workloads. Surface tail-latency and consistency issues before they reach prod.
Invest in observability. Detect index divergence proactively, not after customers complain.
What’s Next: Digital Employees Powered by Indic Agentic LLMs
We’re excited to announce that next week we’re rolling out the new DheeGPT platform alongside our first Indic Agentic LLMs. These models will underpin Dhee.AI Digital Employees—reliable, multilingual agents tailored for Indian enterprises.
👉 Keep an eye on DheeYantra’s page for the official launch and demos.
👉 Reach out to explore how Dhee-powered Digital Employees can transform your workflows—whether in support, finance, HR, or field services.
Reliable AI starts with dependable infrastructure—and when it comes to reliability – we don’t “play”.
Mail me your digital employee requirements at Sales at DheeYantra dot Com. Let’s build the future, together.
I had recently upgraded my laptop from Ubuntu 20.04 from 22.04. Once restarted after the upgrade, my laptop just wouldn’t connect to any network (LAN/Wifi/USB tethering)
After installing chromadb, when we try to start it using the command
chroma run --host localhost --port 8000 --path /home/user/chromadata
Its give this error:
Traceback (most recent call last):
  File "/home/dheeyantra/.local/bin/chroma", line 5, in <module>
    from chromadb.cli.cli import app
  File "/home/dheeyantra/.local/lib/python3.8/site-packages/chromadb/__init__.py", line 79, in <module>
    raise RuntimeError(
RuntimeError: Your system has an unsupported version of sqlite3. Chroma                     requires sqlite3 >= 3.35.0.
Please visit                     https://docs.trychroma.com/troubleshooting#sqlite to learn how                     to upgrade.
Fix:
pip install pysqlite3-binary
vi ~/.local/lib/python3.8/site-packages/chromadb/__init__.py

#add these lines to the TOP OF THE FILE and save it.
__import__('pysqlite3')
import sys
sys.modules['sqlite3'] = sys.modules.pop('pysqlite3')